Introduction
In today’s day and age where we store every crucial detail of our life digitally which is a growing concern for privacy among individuals. It is difficult if we have to share our laptops or mobile phones with someone. The prime reason being, there is some sort of data which we all have that we want to be personal. It can be our tax reports or it can be our identity proofs which we do not necessarily want to share with other people.
So, today’s article is all about how we can hide our different files and folders which may contain information which we want to keep to ourselves on a Mac operating system. We are going to discuss different ways we can hide files and folders so that it is not accessible to anyone other than us. We will be discussing different system settings and also about some third party applications. So, without further ado let’s get straight into it.
Using terminal
This is probably the best and easiest way to hide files and folders on your Mac. Follow the given the steps to do so:
Step 1: Open spotlight search by pressing F4 or cmd+space.
Step 2: Search terminal and click return.
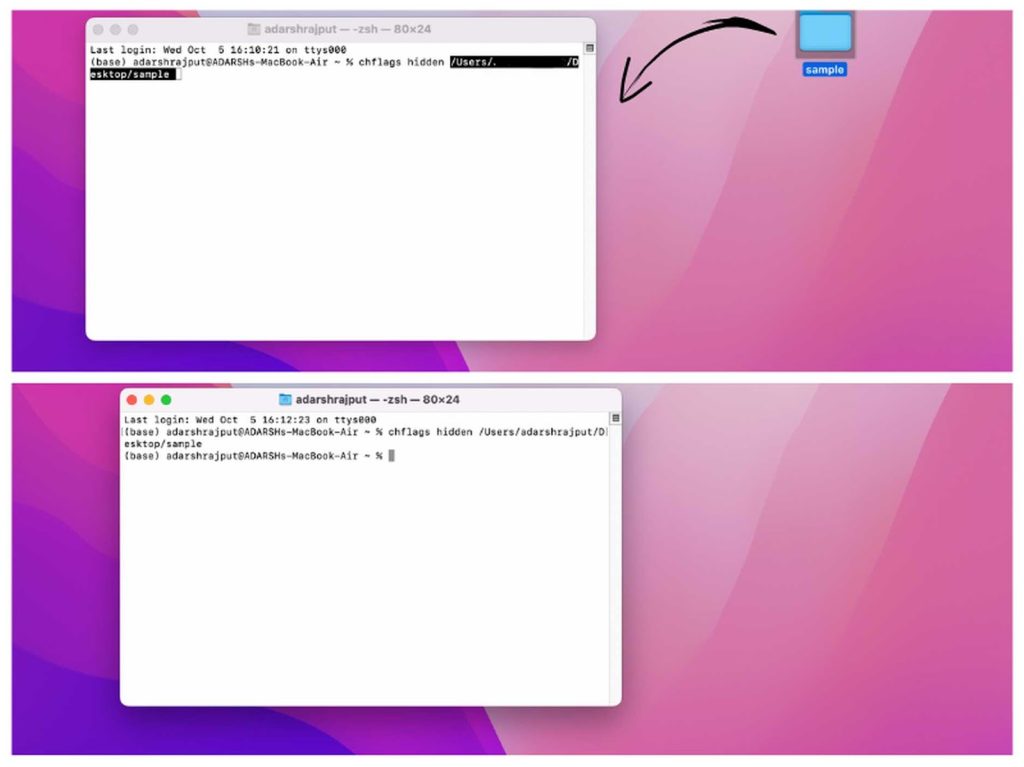
Step 3: Type the following line: chflags hidden
Step 4: Drag and drop the file or folder you want to hide in the terminal after writing the provided command.
Step 5: Press return
The provided file will be hidden.
Now let’s discuss the ways how we can access these hidden files which we hid using the above method. There are two ways to do it.
Using terminal to access it
Use the following steps to access the hidden files or folders. But for this method to work you must have the path of the hidden folder. So, write down or copy the path of the file or folder while hiding it from the terminal.
Step 1: Open spotlight search by pressing F4 or cmd+space.
Step 2: Search terminal and click return.
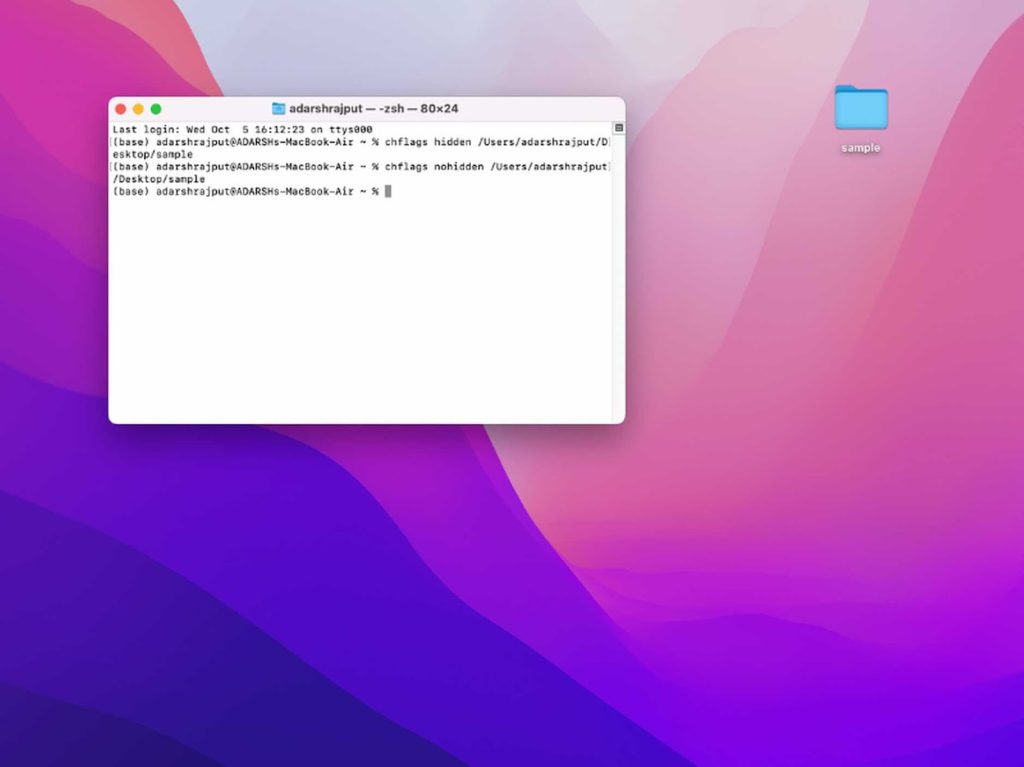
Step 3: Type the following line: chflags nohidden
Step 4: Write the path of the hidden file or folder you want to access in the terminal after writing the provided command.
Step 5: Press return
The provided file will be unhidden.
Note:
Use space after chflags hidden or chflags nohidden command before dropping the file or writing the file path in the terminal.
Using cmd+shift+period(.) shortcut
I have read some articles that mention that this shortcut can be used to hide the folders too. But in reality it is not the case, it can only be used to access the hidden files or folders.
This method is widely known among mac users and that is its biggest demerit. Anyone who wants to access your files can easily do so by this method but we got you covered.
We are also going to tell you a way that this command will not work and your files will be harmlessly hidden.
How to use it?
It is as simple as it looks.
You go to the place where you have hidden files and you simply press cmd+shift+period(.) and all the hidden files will be visible. You again press the same keys and they will be hidden again. Remember this can only hide previously hidden files, you cannot select a new file and hide it using this command.
Now let’s discuss how we can prevent someone from using this command and accessing our files. For this you have to follow the given steps.
Step 1: Go to system preferences.
Step 2: Click on keyboard.
Step 3: Click on shortcuts.
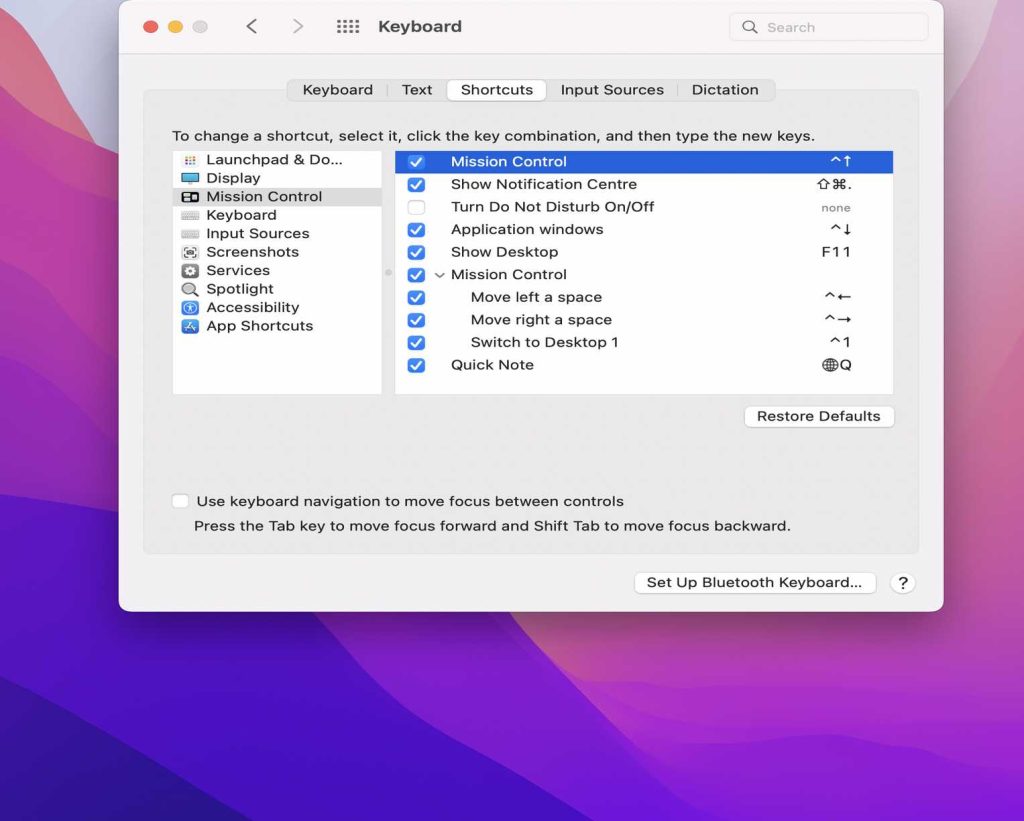
Step 4: Click on Mission control
Step 5: Here you will find many options without the check mark, with no keyboard shortcuts assigned. For example: Show notification center.
Step 6: Select one such option
Step 7: It will ask you to provide a shortcut to it. Press cmd+shift+period(.).
Now you are good to go. No one can access your hidden files without the path of the file or by using cmd+shift+(.) command. Let’s quickly move to the next method.
Using FileVault
The first thing I want to mention is that it is not going to hide your files in a regular manner or as you think a file will be hidden. I simply mean that it is not going to make your file or folder disappear from the screen as the previously discussed method. So, let’s start to learn about FileVault and how we can use it to save our data.
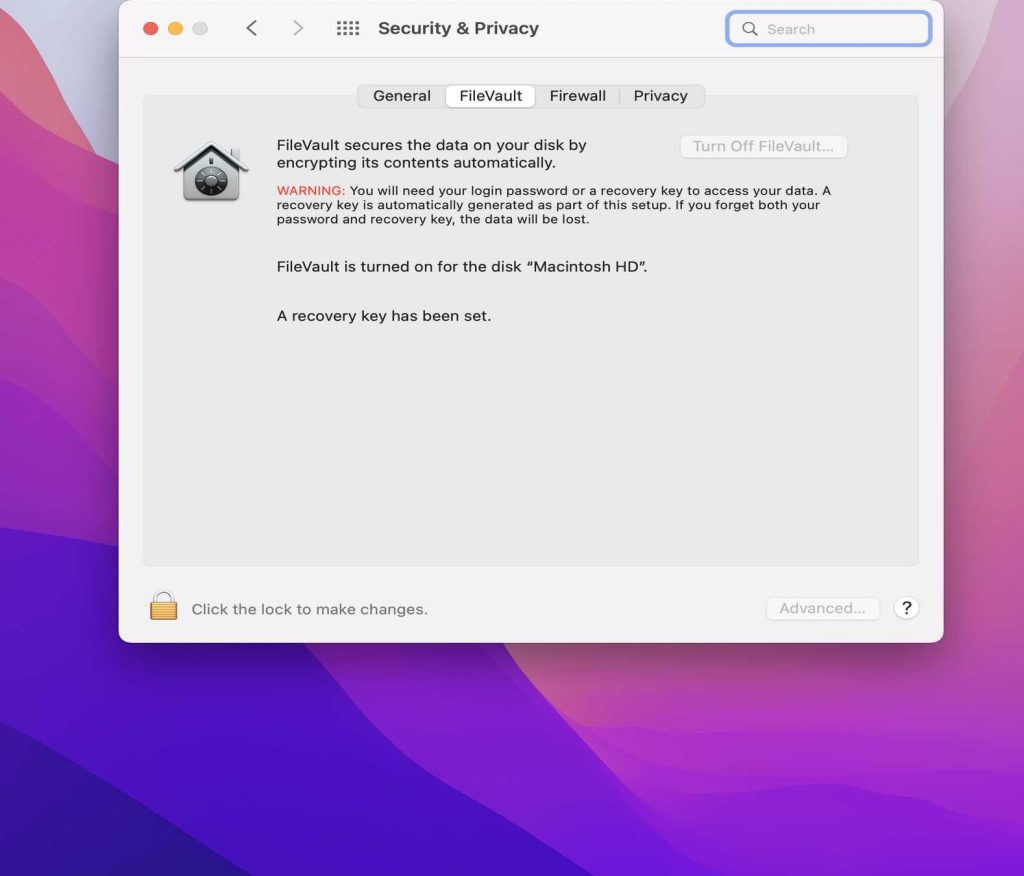
FileVault is used to encrypt your data on your mac. In the older versions of mac you may have to enable it but in newer versions it may have been already enabled. So, what it actually does is encrypt all the data on our drive using a 128-bit AES encryption using a 256-bit key. The encrypted data can only be accessed through a recovery key which you get while setting up FileVault or your user ID and password.
So, by now you may have understood that it will not hide your files but encrypt them. In any case where you lose your laptop, you don’t have to worry about your data being hacked unless the person trying is a quantum computing genius or they have access to your ID and password.
If you are still skeptical you can also create a division in your disk using FileVault which will ask for password, if anyone tries to get access without using login id or password in your computer.
So, let’s set up FileVault if you have not already enabled it and create a hidden disk division. Follow the given steps to do so:
Step 1: Go to system preferences.
Step 2: Go to security and privacy.
Step 3: Click on FileVault.
Step 4: Click on the lock present at bottom left hand corner.
Step 5: Enter your login id and password.
Step 6: Enable your FileVault and get your recovery key, if it is not already enabled.
Now, let’s discuss how we can create a hidden division on our disk using FileVault. It is a practice not everyone is familiar with. Follow the given steps to do so:
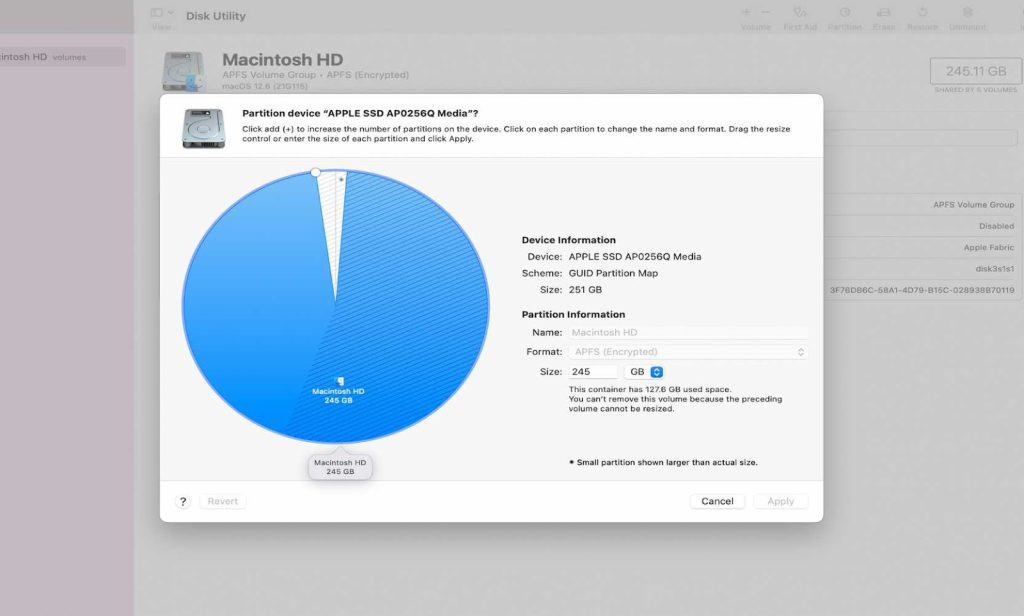
Step 1: Open spotlight search by pressing F4 or cmd+space.
Step 2: Search “Disk Utility”.
Step 3: Press enter and open Disk Utility.
Step 4: Click on “Partition”.
Step 5: Click on the “+” icon just below the pie graph.
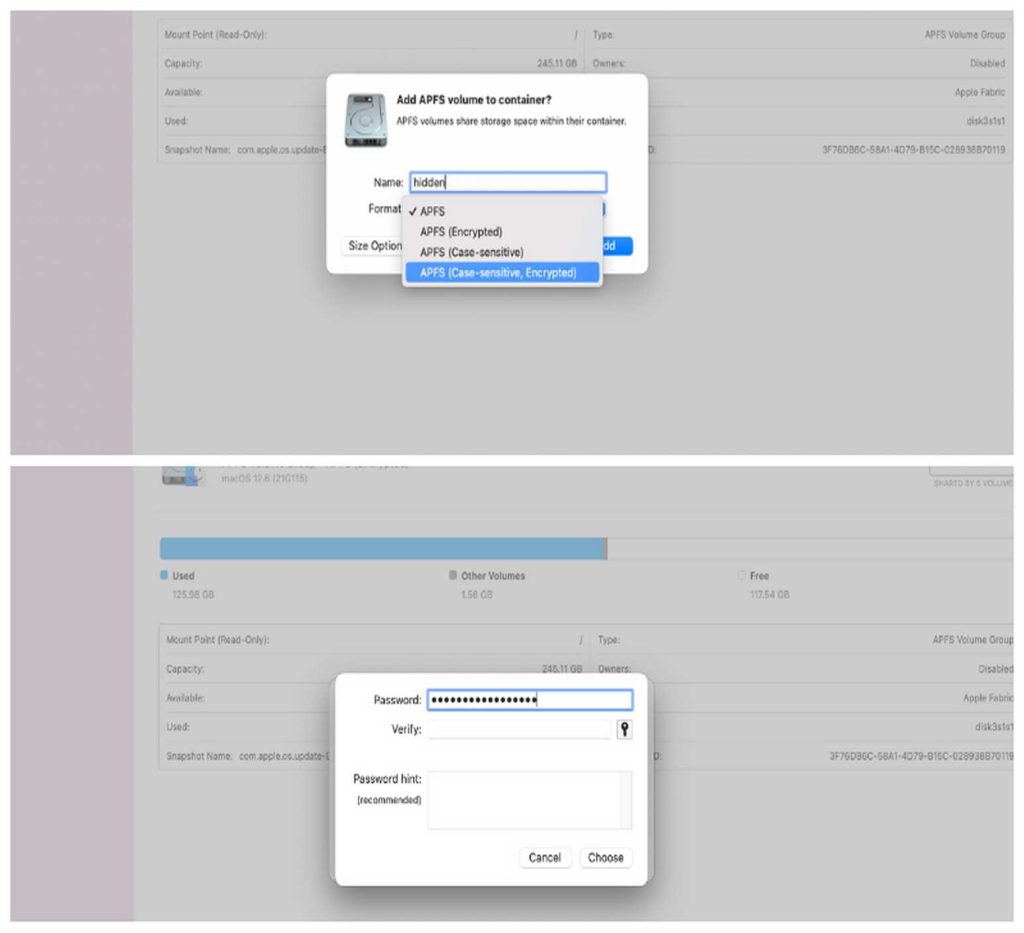
Step 6: Name your partition.
Step 7: Provide format – APFS(case-sensitive, encrypted).
Step 8: Set your password. You can also use your system password assistant to provide a long and strong password.
And now you are good to go. Store all your important data on this partition so that if your system gets lost no one can access your personal data. But remember one this partition is not hidden for people who get in your computer through legal means i.e. by using your login and password.
Some people suggest that FileVault makes your system slow but it is not the case with mac’s having T2 chips and above. In newer versions it gives you an option of enabling it when you set up your system when it’s brand new. If you ask me I would suggest that you enable it if you have very crucial information on your system.
Creating a user account
Creating a user account will only let the user access your browser and some shared files. So, if you are giving your mac to someone who only wants access to the web, in my opinion it is the best practice because you don’t have to worry about your crucial information being accessed by any means possible.
Step 1: Go to system preferences.
Step 2: Go to “Users and Groups”.
Step 3: Click on “Add Account”.
Step 4: Select the type of account to Standard or Sharing only.
Step 5: Name the user account and set up your password.
Using mv command
The “mv” command is used to move one file to another file. This command moves the selected file to a file which contains system information and the catch here is that those files are already hidden. Follow the given steps to do so:
Step 1: Open terminal
Step 2: Write mv
Step 3: Write the file name after a space.
Step 4: Write a system file name after a space and use a dot(.) before its name.
For example: mv sample .config
Step 5: Press return and you are done.
Note:
I tried to hide a file which was on my desktop and it did not move to a system file. So, store your file in another location (like in users) and then use this command.
Using Library folder
The library folder is already hidden on your mac. Your system stores files which should not have easy access in this folder. Follow the given steps to go to library folder and hide your data:
Step 1: Open your finder.
Step 2: Go to the top left hand corner of your desktop.
Step 3: Click on “Go”. A drop-down menu appears.
Step 4: Click on “Go to folder”.
Step 5: Write ~/Library
Now, you have access to the hidden library folder and you can hide your files here.
Using developer tools
I don’t recommend this method and the sole reason being downloading Xcode for hiding files is not a good option. That app alone consumes more than 12 gigs of data on your system and it is not feasible to use it for just hiding apps. If you already use it then you may try it. You can get steps by doing a simple google search.
If we want to use applications to hide files and folders we can use some third party applications.
Using Third party applications
If you ask me, the above mentioned methods are enough to hide your data. But I am going to suggest some third party applications to hide your files and folders.
For hiding files on your desktop you can use CleanShotX or One Switch.
There are some better applications such as Altomac and Hide Folders.
Some open source alternatives are AES Crypt, Axrcrypt, File Lock PE.
Conclusion
I hope you found this article to be helpful and you found what you were searching for. All the above methods are tried and tested. You can use any of the above mentioned methods but if you ask you should try out the system setting ones first if that doesn’t satisfy your requirements then use the third party applications.